How to Build a Traditional Threshing Floor
A threshing floor is a designated outdoor space used for threshing, the process of separating grain from chaff. Traditional threshing floors have been an essential part of agriculture for centuries, particularly in rural areas where mechanical threshers are unavailable. Constructing a traditional threshing floor requires careful selection of location, choice of materials, and adherence to proven construction techniques to ensure durability and efficiency.
1. Choosing the Right Location
Selecting an appropriate location is crucial for building an effective threshing floor. Consider the following factors:
- Flat and Open Area: A level surface ensures ease of threshing and reduces grain loss.
- Well-Drained Ground: Avoid areas prone to flooding or waterlogging.
- Wind Exposure: A spot with a natural breeze helps in winnowing (separating grain from chaff).
- Proximity to Storage Facilities: It should be close to granaries or storage areas to facilitate easy transportation.
2. Preparing the Site
Once the location is selected, clear the ground of any vegetation, stones, or debris. The following steps will help prepare the site:
- Marking the Area: Use stakes and ropes to outline the threshing floor’s perimeter. Traditional floors are often circular, with a diameter ranging from 10 to 20 meters.
- Leveling the Ground: Ensure a smooth, even surface using shovels, hoes, or a mechanical grader.
- Compacting the Soil: Stamp the area thoroughly using livestock, rollers, or manual compactors to make the surface firm.
3. Selecting the Construction Material
Traditional threshing floors can be made using different materials depending on regional availability. Common choices include:
- Clay and Mud: Natural, inexpensive, and effective in providing a hard surface.
- Stone or Brick Paving: More durable but requires higher investment.
- Wooden Platforms: Used in specific regions where wood is abundant.
- Concrete or Lime Plaster: Modern alternatives that enhance longevity and ease of maintenance.
4. Constructing the Threshing Floor
The actual building process varies based on the chosen material:
4.1 Building a Mud or Clay Threshing Floor
- Soil Preparation: Mix clay with water and, if available, add straw or cow dung for extra binding.
- Layering: Spread the mixture evenly over the compacted ground.
- Compacting: Stamp or roll the surface until it becomes smooth and hard.
- Drying: Allow the floor to dry completely, which may take several days.
- Sealing: Apply another thin layer of clay or a protective coating of cow dung to reinforce durability.
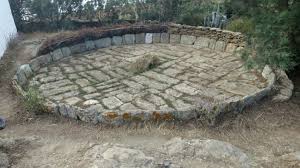
4.2 Constructing a Stone or Brick Threshing Floor
- Laying the Foundation: Dig a shallow trench around the marked perimeter and fill it with compacted gravel for drainage.
- Arranging Stones or Bricks: Lay flat stones or bricks in a tightly packed, uniform pattern.
- Filling Gaps: Use a clay, lime, or sand mixture to fill gaps and create a solid surface.
- Final Compacting: Roll or tamp the surface to secure the stones or bricks in place.
- Sealing: Apply a lime wash or clay sealant to minimize dust and smooth the surface.
4.3 Constructing a Wooden Threshing Floor
- Creating a Framework: Build a raised platform with wooden planks supported by a strong frame.
- Securing the Wood: Ensure the planks are tightly joined to prevent gaps where grain might fall through.
- Sanding and Sealing: Smooth the surface and apply a protective coat to prevent rot and pest infestation.
5. Maintaining the Threshing Floor
To ensure longevity and efficiency, regular maintenance is necessary:
- Sweeping and Cleaning: After each use, remove residual grain, dust, and debris.
- Re-Sealing: Apply a fresh layer of clay, lime wash, or protective coating as needed.
- Checking for Cracks and Gaps: Repair any damage immediately to prevent further deterioration.
- Pest Control: Keep the area free from rodents and insects that may damage stored grain.
6. Using the Threshing Floor
Once completed, the threshing floor can be used for:
- Manual Threshing: Beating harvested crops with sticks or trampling with animals.
- Mechanical Threshing: Using a threshing machine if available.
- Winnowing: Allowing the wind to separate grain from chaff by tossing the mixture into the air.
7. Advantages of a Traditional Threshing Floor
- Cost-Effective: Requires minimal investment compared to modern threshing methods.
- Environmentally Friendly: Uses natural and locally sourced materials.
- Multi-Purpose: Can also be used for drying grains, gathering, or other agricultural activities.
- Preserves Traditional Farming Practices: Helps maintain cultural heritage and supports sustainable farming methods.
Conclusion
Building a traditional threshing floor is a valuable investment for small-scale farmers and rural communities. By carefully selecting the location, using the right materials, and following proper construction techniques, you can create a durable and efficient threshing area. Regular maintenance ensures its longevity, making it an essential asset for grain processing and storage. With a well-built threshing floor, farmers can improve their post-harvest handling, reduce grain loss, and sustain traditional agricultural methods for generations to come.