How to Make Colby Cheese at Home
Making cheese at home can be a rewarding experience especially when you’re crafting a beloved variety like Colby cheese. This semi-hard cheese, known for its mild flavor and appealing yellow-orange color, is a favorite in many households. Colby cheese is similar to cheddar, but its texture is softer, and the process involves a few unique steps. Whether you’re a beginner or a seasoned cheesemaker, making Colby cheese at home is achievable with the right ingredients, tools, and patience. In this article, we’ll guide you through the steps of making Colby cheese from scratch, highlighting the process, equipment needed, and tips for a successful batch.
Understanding Colby Cheese
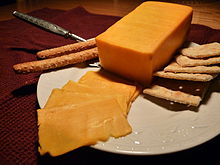
Before diving into the steps of making Colby cheese, it’s important to understand its history and characteristics. Originating in the United States, Colby cheese was first developed in Wisconsin in the 1800s. It’s made from cow’s milk and is similar to cheddar in terms of taste but with a different texture. Colby cheese is known for being milder and more moist than cheddar, with a smooth, slightly crumbly texture when aged. It is often used in sandwiches, melted on burgers, or served with crackers.
Unlike cheddar, which is made through the process of cheddaring (where curds are stacked and pressed), Colby cheese undergoes a slightly different method that results in a more open, moist texture. The cheese’s mild flavor is also due to a shorter aging process compared to sharp cheddar, which requires a longer maturation.
Ingredients for Making Colby Cheese
To make Colby cheese at home, you will need several key ingredients that are standard in cheese making. Here’s a list of what you’ll need:
Milk: The main ingredient for Colby cheese is fresh, whole cow’s milk. Use high-quality milk from a local dairy if possible, as it will make a noticeable difference in the flavor and texture of your cheese. Mesophilic Starter Culture: This is a bacterial culture used to acidify the milk and start the fermentation process. For Colby cheese, you need a mesophilic culture that works well at medium temperatures. Rennet: Rennet is an enzyme that helps coagulate the milk, causing it to separate into curds and whey. You can use either animal or vegetable rennet, depending on your preference. Salt: Salt is crucial for both flavor and preserving the cheese. It also helps to draw out moisture from the curds. Calcium Chloride: This optional ingredient is used if you are using pasteurized milk, as it helps restore the calcium balance and ensures proper coagulation. Water: You’ll need some water for dissolving the rennet and calcium chloride. With the ingredients in hand, you’re ready to begin the process of making your very own batch of Colby cheese.
Equipment Needed for Making Colby Cheese
To successfully make Colby cheese at home, it’s essential to have the right equipment. Here’s a list of what you’ll need: Large Pot: You need a large stainless steel pot that can hold at least 2 to 3 gallons of milk. The pot should be able to withstand heat and be easy to clean. Thermometer: A dairy thermometer is essential to ensure that your milk reaches the right temperatures at each step of the cheese-making process. Cheesecloth: Cheesecloth is used to help drain the whey from the curds after they have been formed. You can use it to wrap the curds for pressing as well. Cheese Mold: A cheese mold is used to shape your Colby cheese and is essential for pressing the curds into a compact form. Press: If you’re aiming for a firmer texture, a cheese press is needed to help remove excess moisture from the curds. While Colby cheese doesn’t need as much pressing as cheddar, some pressing is still required. Slotted Spoon or Ladle: To stir the curds and whey and transfer them as needed. Colander: A colander is used to drain the whey away from the curds. With all of the equipment and ingredients gathered, you’re ready to begin the cheese-making process.
Preparing the Milk
Start by pouring the milk into your large pot. Gently heat the milk to 85°F (29°C), stirring frequently to prevent the milk from scorching. Heating the milk at a controlled, moderate temperature is crucial for achieving the perfect curds.
Once the milk has reached 85°F, sprinkle the mesophilic starter culture over the surface of the milk. Allow the culture to rehydrate for about 2 minutes, and then stir it into the milk. This step helps acidify the milk and creates the right environment for the curdling process.
Let the milk sit undisturbed for about 45 minutes to an hour, allowing it to ferment at this temperature. During this time, the milk will begin to sour slightly, and you’ll notice some thickening. This is the initial stage of fermentation that begins to transform the milk into Colby cheese.
Adding the Rennet
Once the milk has been properly cultured, it’s time to add the rennet. Dissolve your rennet in a small amount of cool, non-chlorinated water and stir it gently into the milk. The rennet will begin to coagulate the milk, separating it into curds and whey. After adding the rennet, cover the pot and let it sit undisturbed for about 45 minutes to 1 hour, or until the curd has formed.
To test if the curds are ready, gently insert a knife or spoon into the curd. If it slices cleanly and the whey begins to separate, the curds are ready to be cut.
Cutting the Curds
After the curds have formed, it’s time to cut them into smaller pieces to allow the whey to drain. Using a long knife or curd cutter, cut the curds into small cubes, approximately ½ inch in size. This helps the curds release more whey and become firmer as they begin to cook.
After cutting, let the curds rest for about 5 minutes to settle. During this time, you’ll notice the whey beginning to separate further from the curds. This is a good sign that the curds are starting to firm up.
Cooking the Curds
Next, you’ll gently heat the curds to around 120°F (49°C), increasing the temperature slowly by about 2°F every 5 minutes. Stir the curds gently to prevent them from sticking together. As you heat the curds, the whey will continue to separate, and the curds will become firmer.
Keep the curds at 120°F for about 30 minutes, stirring occasionally. You may notice that the curds shrink in size and become more compact as moisture is expelled. At this point, the curds are almost ready to be drained.
Draining the Whey and Pressing the Curds
Once the curds have reached the desired firmness, it’s time to drain the whey. Pour the curds into a colander lined with cheesecloth, letting the whey drain away. You can save the whey for other uses, such as in baking or for animal feed.
Once the whey is mostly drained, gather the cheesecloth around the curds and transfer the curds into a cheese mold. The mold will shape the Colby cheese and allow for further moisture to escape during the pressing process.
Press the curds gently at first, using about 10 to 15 pounds of pressure. Increase the pressure gradually over the next 1-2 hours. This helps compact the curds and expel any remaining whey, contributing to the cheese’s texture.
Salting the Cheese
After pressing, remove the Colby cheese from the mold and unwrap it from the cheesecloth. At this point, you’ll salt the cheese. Sprinkle salt evenly on the surface of the cheese, or you can dissolve the salt in water and brine the cheese for a few hours. Salt helps with flavor and preservation, and it also aids in drawing out excess moisture from the curds.
Aging the Colby Cheese
Unlike cheddar, which is often aged for months or even years, Colby cheese is typically enjoyed fresh or aged for a shorter period. After salting, let the cheese sit at room temperature for a day or two to allow the salt to penetrate and for the flavors to develop.
To age the Colby cheese, place it in a cool, humid environment like a wine cooler or cheese cave. Aging Colby cheese for a few weeks will allow it to firm up and develop its full flavor. However, it can also be enjoyed fresh, with a creamy and mild flavor that’s perfect for snacking.
Conclusion: Enjoying Your Homemade Colby Cheese
After a few weeks of aging (or sooner if you prefer a fresher cheese), your Colby cheese will be ready to enjoy. Whether you use it for sandwiches, in salads, or as a tasty snack on its own, homemade Colby cheese is a delight. The process of making cheese at home is a rewarding journey, and with practice, you’ll be able to perfect your technique and customize your cheese to your liking. By following the steps outlined in this guide, you can confidently make Colby cheese at home and enjoy the satisfaction of creating a delicious, artisanal product from scratch.