Step-by-Step Guide to Growing Waxflower
Waxflower (Chamelaucium) is a stunning and versatile flowering plant native to Australia. It is widely grown for its delicate, fragrant blooms and long-lasting vase life. Whether you’re looking to grow waxflower in your garden or as a commercial crop, this step-by-step guide will help you cultivate healthy and vibrant plants.
Understanding Waxflower
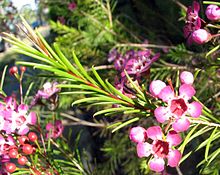
Waxflower belongs to the Myrtaceae family and is known for its needle-like leaves and small, waxy flowers that come in shades of pink, white, and purple. The plant thrives in well-draining soil and warm climates, making it an excellent choice for Mediterranean and temperate regions.
Benefits of Growing Waxflower
Aesthetic Appeal: Beautiful, long-lasting blooms ideal for floral arrangements.
Drought-Tolerant: Requires minimal water once established.
Pollinator-Friendly: Attracts bees and butterflies.
Low Maintenance: Resistant to pests and diseases.
Step 1: Choosing the Right Location
Waxflower thrives in full sun, so select a location that receives at least 6-8 hours of direct sunlight daily. It prefers well-draining, slightly acidic to neutral soil (pH 6.0-7.5). Avoid heavy clay soils, as they can retain excessive moisture and cause root rot.
Ideal Conditions:
Temperature: Prefers warm temperatures (15-25°C or 59-77°F).
Sunlight: Full sun exposure.
Soil: Sandy or loamy soil with good drainage.
Protection: Shelter from strong winds to prevent damage to delicate branches.
Step 2: Preparing the Soil
Proper soil preparation is key to successful waxflower growth. Follow these steps to optimize soil conditions:
Test the Soil pH: Use a soil pH tester to ensure the pH is between 6.0 and 7.5.
Improve Drainage: If the soil is too heavy, mix in sand or organic compost to enhance drainage.
Add Organic Matter: Incorporate well-rotted compost or mulch to improve soil fertility.
Avoid Overwatering: Ensure the site is not prone to waterlogging.
Step 3: Planting Waxflower
Waxflower can be grown from seeds, cuttings, or nursery plants. Here’s how to plant it:
From Seeds:
Soak the seeds in warm water for 24 hours to improve germination.
Sow the seeds in well-draining seed trays or directly in the soil.
Keep the soil moist but not soggy.
Germination typically takes 2-4 weeks.
From Cuttings:
Take semi-hardwood cuttings (10-15 cm long) from a healthy plant.
Remove lower leaves and dip the cut end in a rooting hormone.
Plant in a pot filled with a well-draining potting mix.
Keep in a warm, humid environment until roots develop (4-6 weeks).
From Nursery Plants:
Dig a hole twice the width of the root ball.
Place the plant in the hole and backfill with soil.
Water thoroughly after planting.
Step 4: Watering and Fertilizing
Watering:
Water young plants regularly until established.
Once mature, waxflower is drought-tolerant and requires minimal watering.
Avoid overwatering, as excessive moisture can lead to root rot.
Fertilizing:
Apply a balanced fertilizer (10-10-10) in early spring.
Use organic compost or mulch to enhance soil nutrients.
Avoid excessive nitrogen, as it can lead to excessive foliage growth with fewer flowers.
Step 5: Pruning and Maintenance
Regular pruning promotes healthy growth and abundant flowering.
Pruning Tips:
Prune after flowering to encourage new growth.
Remove dead or diseased branches.
Shape the plant to maintain a compact form.
Avoid heavy pruning, as waxflower blooms on new wood.
Step 6: Pest and Disease Management
Waxflower is relatively pest-resistant but may encounter occasional issues.
Common Pests:
Aphids: Spray with neem oil or insecticidal soap.
Spider Mites: Increase humidity and use miticides if necessary.
Scale Insects: Remove manually or treat with horticultural oil.
Common Diseases:
Root Rot: Prevent by ensuring proper drainage and avoiding overwatering.
Powdery Mildew: Treat with fungicides and improve air circulation.
Step 7: Harvesting and Using Waxflower
Waxflower is popular in floral arrangements due to its long vase life.
Harvesting Tips:
Cut stems early in the morning when flowers are fully open.
Use sharp, clean shears to avoid damaging the plant.
Remove excess foliage before arranging.
Uses:
Floral Bouquets: Adds texture and fragrance to bouquets.
Dried Arrangements: Retains color and form when dried.
Essential Oils: Used for fragrance and aromatherapy.
Step 8: Propagation for Future Growth
To expand your waxflower collection, propagate new plants from cuttings or seeds.
Propagation Steps:
Select healthy cuttings and prepare as mentioned earlier.
Plant in a warm, humid environment.
Transplant into the garden once well-rooted.
Conclusion
Growing waxflower is a rewarding experience for gardeners and florists alike. By following this step-by-step guide, you can cultivate healthy, vibrant plants that thrive in various conditions. With proper care, your waxflower plants will bloom abundantly, providing beauty and fragrance year after year. Whether for personal enjoyment or commercial use, waxflower is a fantastic addition to any garden or floral business.